This guide explains the recommended in-venue audio configurations for Automated Video Production (AVP). It covers supported hardware, cabling options, distance limits and setup requirements for connecting commentary audio to the AVP server.
Important: Choose the setup that matches best for your arena configuration. In general, go for
Option 1: Mixer Table + USB Audio Interface. A direct USB mixer connection is supported only
when the mixer is no more than 5 m (16 ft) from the server.
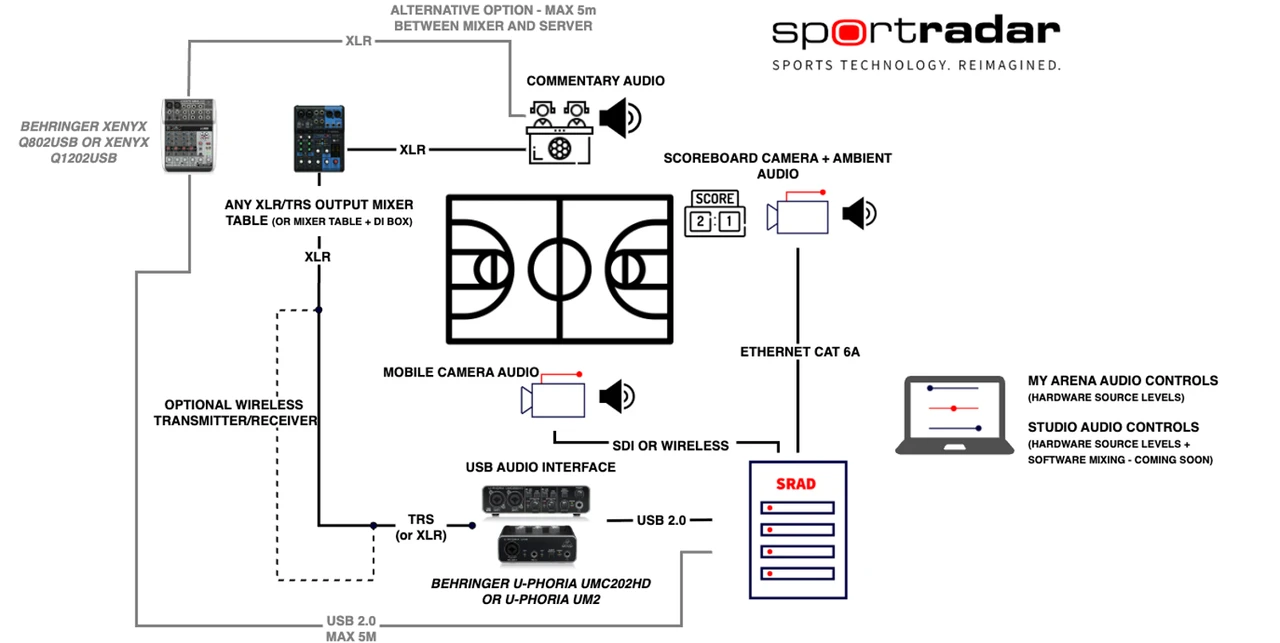

Option 1: Mixer Table + USB Audio Interface
Hardware Requirements
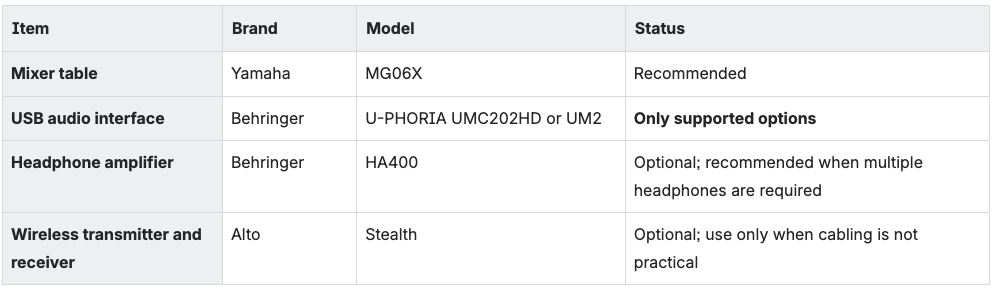
Cabling Options
Choose one of the following cabling methods.
Method 1: Installed XLR Cable
Recommended for distances up to 100 m.
Use installed or in-wall XLR cabling when there is a long distance between the commentary position and the AVP server.
At the commentary position:
Connect the mixer output to an XLR female-to-male cable.
Connect the cable to a 3-pin XLR female wall socket.
At the AVP server:
Connect the 3-pin XLR male wall socket to either:
XLR female-to-TRS male cable, or
An XLR female-to-XLR male cable
Connect the cable to the Behringer USB audio interface.
Connect the USB audio interface to the AVP server.
Important: If you connect an XLR male plug directly to the audio interface, make sure the PAD switch is turned on.
Method 2: Direct Cable
Recommended for distances up to 30 m.
Connect the mixer output to either:
An XLR female-to-TRS male cable
An XLR female-to-XLR male cable
Connect the cable directly to the Behringer USB audio interface.
Connect the USB audio interface to the AVP server.
Important: If you use an XLR male connection at the audio interface, make sure the PAD switch is turned on.
Method 3: Wireless Transmitter and Receiver
Use a wireless connection only when a wired installation is not possible. Cabling is preferred because it generally provides a more stable and reliable signal.
At the commentary position:
Connect the mixer output to an XLR female-to-XLR male cable.
Connect the cable to the Alto Stealth transmitter.
At the AVP server:
Connect the Alto Stealth receiver to either:
An XLR female-to-TRS male cable
An XLR female-to-XLR male cable
Connect the cable to the Behringer USB audio interface.
Connect the USB audio interface to the AVP server.
Important: If you use an XLR male connection at the audio interface, make sure the PAD switch is turned on.
Option 2: USB Mixer Connected Directly to the Server
Use this setup only when the mixer can be placed within 5 m (16 ft) of the AVP server.
Hardware Requirements
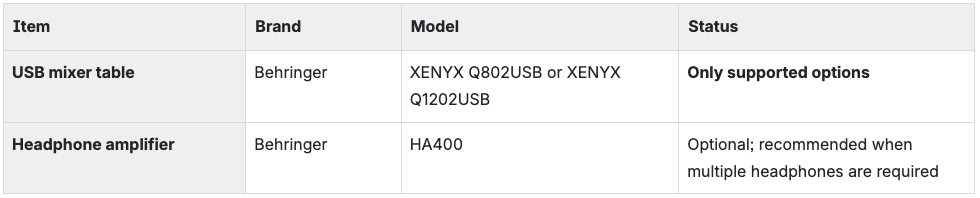
Connection Steps
Position the Behringer XENYX mixer no more than 5 m from the AVP server.
Connect the commentators' microphones to the mixer inputs.
Connect headphones directly to the mixer or use the optional Behringer HA400 headphone amplifier when additional headphone outputs are needed.
Connect the mixer directly to the AVP server with a USB cable.
Important: The total USB cable distance between the mixer and the AVP server must
not exceed 5 m.
Remote configuration
Once you have connected the audio interface (option 1) or USB mixer (option 2) to the AVP server, reach out to our support (support@synergysports.com) to ask for our team to configure the system to ingest audio from your commentary hardware. Please provide The venue name and the mixer and audio interface models.
Once the remote configuration is finalized, you will be able to see your audio source listed in our web applications.
Please use the following links for support with Configuring or Editing Streaming Configurations and the Control Room Guide.
Troubleshooting
The audio is distorted or clipping
Follow the mixer table manufacturer recommendations
If an XLR male connector is plugged into the USB audio interface, confirm that the PAD switch is on.
Further Assistance
If you need help selecting or configuring the correct in-venue audio setup, contact support (support@synergysports.com) and include:
The venue name
The mixer and audio interface models
A description or photo of the cabling
Was this article helpful?
That’s Great!
Thank you for your feedback
Sorry! We couldn't be helpful
Thank you for your feedback
Feedback sent
We appreciate your effort and will try to fix the article