1.) Starting a Match
a.) Selecting a Mode
“Before you begin managing a match, you will need to select which mode of data
you will be working with.
i. Select ‘SCORE’ if you will be collecting the statistics for the match
ii. Select ‘CLOCK’ if you will be managing the clock for the match

b.) Selecting Direction of Play
“First, look at the direction that the teams are currently facing. If the teams are pointed
in the opposite direction, select the Direction Arrows icon to reverse the direction of play
for both teams.”

2.) Live Scoring
a.) Possession Tracking
i. Users can track each possession by selecting the Team Tile depending on
where the ball is on the field. Each Team Tile has a hotkey associated with it f
or users to use their keyboard to track possessions or use their mouse to select each tile.

b.) Substitutions
i. When a player enters the field of play, select the relevant player tile.
There is no requirement to deselect players when they exit the field.

c.) Substituting a Goalkeeper
ii. If a goalkeeper comes off the field, select the relevant player tile
and that will deselect that player.

3.) In-Game events
a.) Adding a Goal
i. “When you select the GOAL button, you can select a player,
or confirm the player number later.”

b.) Adding a Challenge
i. When you select the CHALLENGE button, the Action Log on the right
side of the screen will display that a Challenge event has been logged.
*The Challenge buttons will become inactive for 3 secs after selection.

c.) Adding a Penalty Stroke
i. If you select PENALTY STROKE button, you will need to select the
player who will take the Penalty Stroke.

ii. After selecting the player, you will choose the Penalty Stroke outcome:
Scored or Missed

d.) Adding a Video Review
iii. If a video review occurs, you will need to select the Video Review button.
Then follow the necessary sequence (Team or Umpire) until the Video
Review has been indicated as Successful or Rejected.

4.) Managing Player Cards
e.) Allocation of Cards
i. Cards are given to players by the umpire depending on their conduct
on the field. Cards can be logged during open play.
1. During open play, select the relevant Card button
for which team received the card.

f.) Types of Cards
ii. There are three different types of cards: Green, Yellow and Red.
Select the type that applies.

g.) Green Card
iii. When a Green card is selected, choose the player who received the card.

iv. Once you’ve selected the player, start the card countdown timer by selecting
START on the relevant player’s tile. Only select START once the player has sat down.

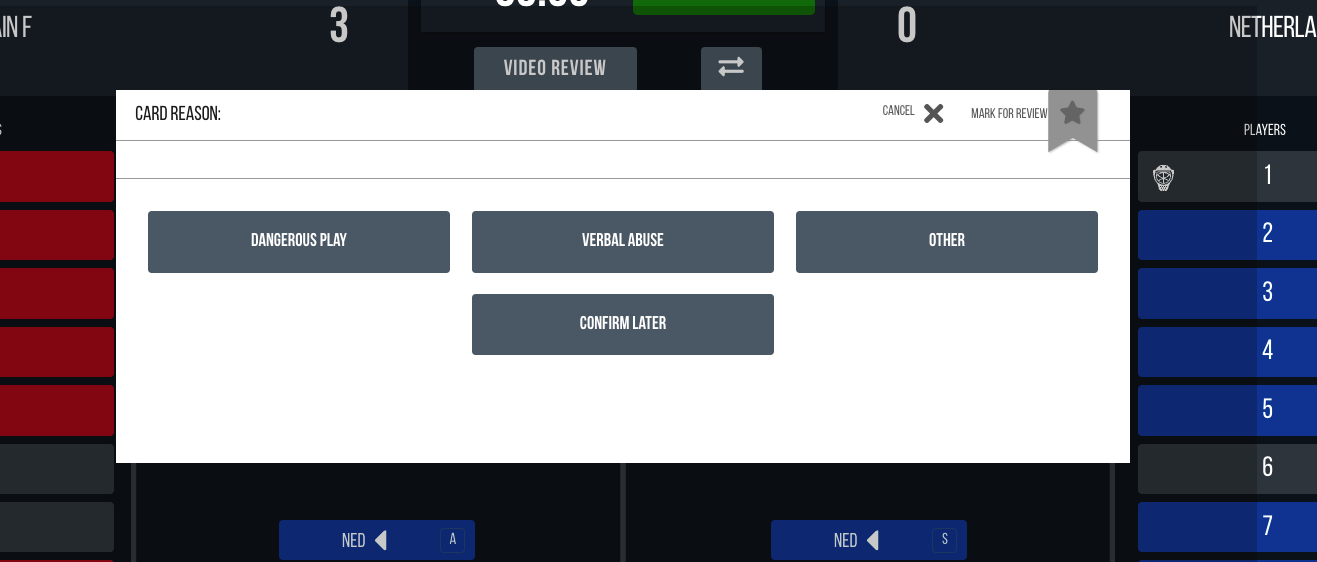
h.) Yellow Card
v. When a Yellow card is selected, choose the player who receives
the card, how many minutes the player is suspended for, and the
reason for the card, or select Confirm Later.


vi. Once you’ve selected the player, time & reason for the card, start the card countdown timer by selecting START on the relevant player’s tile. Only select
START once the player has sat down.

i.) Red Card
vii. When a Red card is selected, choose the player who receives the
card and the reason for the card.
5.) Game Log Navigation
a.) Navigating the Game Log
i. Users can navigate the Game Log using the available filters on the
right hand side of the screen.
Filter by:
1. Periods/Quarters
2. Players
` 3. Goals, Cards & Flagged events

j.) Editing an event
ii. From the Game Log, select the pencil icon at the top right of the event
you wish to edit.

iii. The Edit Play screen will appear displaying options for editing.
Select your option, then click the green arrow.

iv. After editing the event, save it by clicking the Close button. 
v. If you would like to delete an event, select the red trash can icon.

k.) Inserting an Event
vi. Stop the clock and select one of the Insert icons on the Game Log.

vii.The clock will illuminate Green to indicate you are inserting an event.
Edit the clock to the time in which the missed event occurred. Then select
the event you wish to insert (ex. Circle Entry, Card, PC Outside Circle).
You will need to confirm that you wish to insert the event.

7.) Shootout
a. Starting a Shootout in Clock mode
b. Managing the Shootout stop clock (clock mode only)
c. Starting a Shootout in Score mode
d. Select the player & goalkeeper for the first shot
e. Select the goal outcome
f. Ending a Shootout
g. Ending and Confirming a match in Clock mode
8.) Starting a Shootout in Clock mode
“Once you END & CONFIRM the final period of regular play, you should select the option SHOOTOUT.”

9.) Managing the Shootout stop clock (clock mode only)
“Once you’ve selected SHOOTOUT, you’ll be able to manage the Shootout stop clock. Click START to begin the stop clock and click RESET to reset the stop clock back to its original value”

10.) Starting a Shootout in Score mode
“Once the Timing Judge has confirmed the last period of regular play and initiated the Shootout workflow, a SHOOTOUT button will appear for you to select.”
“Upon selecting the SHOOTOUT button, select the Shootout coin toss winner”

“Upon selecting the team who won the coin toss, you’ll need to select the team that will take the first shot in the Shootout.”

11.) Select the player & goalkeeper for the first shot
“Select the player tile for the player who will take the shot. Also, select the Goalkeeper from the opposition team who will face the Shootout shot”.

12.) Select the Goal outcome
“Once you have selected a player to take the shot and the opposing goalkeeper, you’ll be able to select the outcome of the shot – GOAL or NO GOAL.”
“Continue this process throughout the Shootout”
13.) Ending a Shootout
“Once the Shootout has ended, select the END SHOOTOUT button”

“This will end the Shootout workflow and return you to the game screen. The Timing Judge will confirm the match from their screen so you can close your browser”.
14.) Ending and Confirming a match from Clock mode
“Once the Shootout has finished, select the END MATCH button. You will be asked to confirm your decision and then CONFIRM the match”.

Was this article helpful?
That’s Great!
Thank you for your feedback
Sorry! We couldn't be helpful
Thank you for your feedback
Feedback sent
We appreciate your effort and will try to fix the article